LVP Flooring Installation Tips
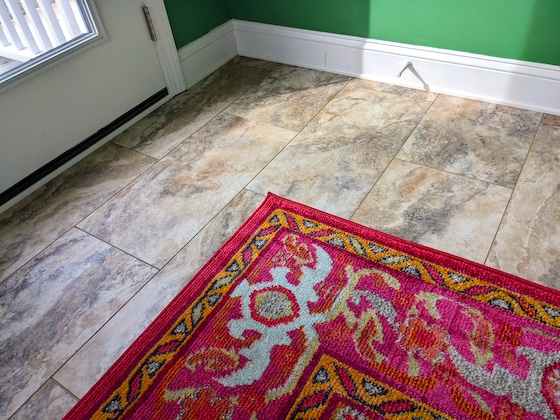
LVP Flooring Installation - This is a new luxury vinyl plank floor that looks like travertine stone. The area rug adds a delightful splash of color and helps to absorb sound. Don’t be afraid to introduce bold colors or patterns. Copyright 2024 Tim Carter
LVP Flooring Installation Tips & Area Rugs
By: Tim Carter
Several months ago, I shared a story about my first experience with luxury vinyl plank (LVP) flooring. I installed the LVP in a basement room that experienced water damage caused by a leaking water pipe. The product was affordable, it was easy to install, and after six months, it looks as good as the day it was put down.
My son saw the floor and was amazed. He purchased a new home two years ago. For some odd reason, the builder installed wall-to-wall carpeting in a sunroom at the rear of the house. An exterior door leading to the backyard is in this room. Keeping the carpeting clean had become a constant battle. LVP flooring installation was in his immediate future.
“Dad, let’s rip up the carpeting and install some of the LVP like you did at your home. What do you think would be a good look for this room?”
“Well, your mom and I were torn between the walnut plank we have and a large-format beige travertine product. I vote for the travertine one for your sunroom because you’ve got two walls of windows. The sunlight streaming into the room will enhance the lighter LVP. The large format and light color should make the room feel bigger too.”
Area Rugs Add Accents
My wife agreed 100 percent and offered up a suggestion that took this room to the next level. She said, “Once you guys install the new LVP, put down a colorful area rug that leaves about a two-foot border around the room. You’ll still see the LVP, but the area rug will add texture, absorb sound, and look spectacular.”
We jumped into the project on a Saturday morning. It took just a few minutes to cut the carpeting into strips about 3 feet wide. We rolled them up like sausage links, wrapped a strip of painter’s tape around them, and pitched them into the back of my truck. An hour after that we had the tackless strip up, all the carpet pad staples removed, and the floor was vacuumed clean. We were ready to install the LVP in the room that measured 12 feet by 12 feet.
Install Underlayment
The manufacturer recommended installing a thin foam underlayment. We did this. Unfortunately, the installation instructions for the LVP were sub-standard. The video skipped a few very important steps.
We had to use my vibrating multi-tool that works just like a barber’s hair clippers. This tool has a very thin blade that allowed me to undercut the door trim that extended down to the subfloor. We wanted a clean look where the LVP slid under the wood trim. I placed a piece of the LVP upside down next to the wood casing, and the thin blade cut just enough off so the LVP slid under the trim creating a professional look.
My LVP flooring had interlocking ends. In my case, you placed the next piece of flooring tight to the previously installed piece and then whacked it with a rubber mallet to snap the two pieces together.
Not All LVP Installs the Same
My son’s LVP was different. It’s important to realize his LVP panels measured 1 foot wide by 2 feet long. I discovered you had to lock in the long edge first. The trick was to keep the short edge about 1/16th inch away from the previously installed piece. Once you had the long edge tight and flat on the underlayment, you then used a special block to tap the short edge into place.
It’s mission-critical that you maintain a 1/4-inch space around the outer edge of the LVP. This is required for expansion and contraction. The best way to do this is to purchase innovative spacers that are shaped like the letter T.
The spacer has hard plastic squares 1/4-inch thick at the end of a longer thin strip. One of the squares disappears when you place the first piece of a row against the wall or a baseboard. The spacers prevent the LVP from moving when you start to tap the short edge with the hammer to get the second piece to interlock with the first piece. Without the spacers, you’ll end up tapping the entire row tight to the wall or baseboard.
We installed all the LVP in just four hours. The first and last rows consumed 80 percent of the time because of the required cuts. Each full piece that required no cutting was installed in a minute or less. You only need minimal skills and a few tools to install LVP.
The subfloor needs to be in the same plane so the LVP interlocks and stays locked when you walk on it. Low spots can be filled in with floor leveling compound.
Cutting LVP can be done with a sharp razor knife. Once you cut about 1/4 of the way through the material with repeated strokes, you flip it over and snap it the same way you break a piece of drywall.
Once the LVP was installed, we installed a discreet toe strip around the room to hide the required 1/4-inch gap. It was now time to unroll the stunning red and gold area rug. Once again, my wife’s advice was stellar. The area rug made all the difference. I never doubt her wisdom! Maybe that’s why we’re about to celebrate our 50th wedding anniversary in six months!
Column 1547
2 Responses to LVP Flooring Installation Tips